6x1 HDMI & VGA Switcher
We’ve all experienced it…you walk into a meeting room and there are cables all over the place…a couple on the table, a couple under the table, maybe one dangling from the projector or display. You place your laptop on the conference room table and ask, “which cable do I use to connect my presentation?†Your colleague just stares back blankly… Great, this meeting is off to a wonderful start…
The problem is exacerbated when you have multiple people all trying to share content. A poorly implemented meeting room that is difficult for one presenter to use efficiently is near impossible for multiple participants.
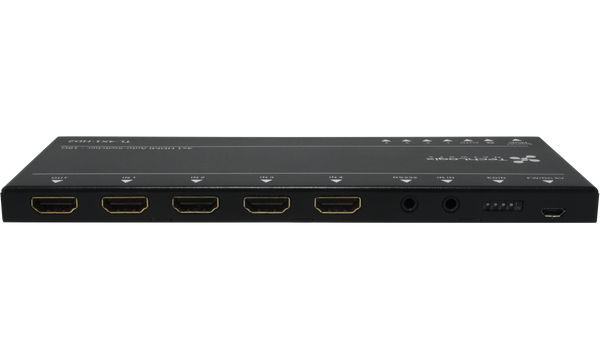
Enter the TL-6X1-HDV. This compact switcher automatically manages the connections of up to six unique users—no more passing cables, pushing buttons, and untangling knots. Each user gets their own cable and the system automatically “senses†when someone plugs in and makes their device live to the display. Plus, HDMI and VGA dual connectivity ensure both new and old devices can connect to the system.
Installation and use is easy: place the TL-6X1-HDV on or under the conference room table, run up to four HDMI cables and two VGA cables to the different points on the table, and connect your devices (typically laptops, tablets, and phones). Cables don’t need to move and the TL-6X1-HDV handles user signal switching and distribution. You can even connect secondary audio-video inputs, such as BluRay players, dedicated computers, and cable boxes.- Technical Features
- Resources
- Accessories
- Installation
- FAQ
- SKUs
-
- (4) HDMI inputs
- (2) VGA inputs
- (1) HDMI output
- Scaling to WUXGA
- 4K@30 HDMI pass-through
- 1080p@60 support
- Automatic switching with connection sensing
- Manual switching via IR, RS232 & front panel
- Analog audio de-embedding
- Analog audio embedding on the VGA channel
-
Specification Sheet
Design and Installation Guide
Manual
Product Video
Design Help
Installation Help
CommWatch Software -
-
- Connect the TL-6X1-HDV to up to six source devices using HDMI and VGA cables.
- Connect the TL-6X1-HDV to the display using an HDMI cable.
- If controlling the TL-6X1-HDV remotely, connect the remote control cables (included in the package) to
- the TL-6X1-HDV. If controlling the TL-6X1-HDV automatically (through automatic sensing and switching), leave the control ports unconnected.
- Connect the power supply (included in the package) to the TL-6X1-HDV.
- Connect the power supply to an AC outlet or power source.
- Select the switching mode (automatic or manual) via the front panel button on the TL-6X1-HDV.
-
What comes in the package?
Each TL-6X1-HDV includes a 6x1 switcher, mounting hardware (great for wall or under-table mounting), rubber feet for table top use, an RS232 control cable, an IR control cable, a wireless remote control, a power supply, and an installation guide.
What’s the max length of HDMI cable that I can connect to the switcher?
It really depends on the cable type and quality. Typically, we recommend using a twisted pair or fiber optic extender set for cable runs longer than 50 feet.
Do I need to power the unit?
Yes, the TL-6X1-HDV requires power and ships with a power supply.
What does “automatic switching with connection sensing†really mean?
Automatic switching with connection sensing refers to how the TL-6X1-HDV selects and shows content on the display. For example, there are six separate inputs on the switcher allowing six separate source devices (typically laptops, computers, tablets, or other portable devices) to be connected simultaneously. When someone physically connects their source device to an HDMI or VGA cable connected to the TL-6X1-HDV it will “sense†someone connected and automatically switch to that channel, thereby showing the source device’s information on the display.
That’s great, but how does automatic switching different from traditional switchers?
Most switchers require “manual switching†through a remote control, the buttons on the switcher itself, or a stand-alone control system. They will not sense a connection and switch to the channel.
That makes sense, but I kind of like the idea of manually switching channels so I know exactly which device is showing on the display.
That’s fine…the TL-6X1-HDV also facilitates manual switching through buttons on the front panel, IR and RS232. It even ships with a wireless remote control!
Wow, you really thought of everything. If I am controlling the switcher manually, do you recommend IR or RS232?
Most commercial contractors and installation professionals choose to use RS232 because it tends to be more customizable and reliable. Think of it like a cellphone (IR, which is based on light) versus a landline (RS232, which is based on electricity)—the cellphone works great most of the time, but sometimes the signal has a little bit of drop out and you need to repeat what you were saying. Your message will still get across, but it’s bit annoying pushing the button twice. The downside to RS232 is it tends to have a greater overall system cost—control systems that support RS232 are typically much more expensive. Honestly, we see most people use IR.
Let’s go back to the automatic switching…what happens if multiple source devices are connected at the same time and we want to switch channels? I thought you need a physical connection for the switcher to “sense†and switch?
Correct…sort of. When in an automatic switching mode, the TL-6X1-HDV requires a physical sync in order to switch channels. The most common sync signals are generated when a cable is plugged or unplugged. If you have multiple devices connected simultaneously (the TL-6X1-HDV supports up to six) you will need to trigger a sync. The good news is a sync can be created without a physical plug or unplug. On computers, simultaneously hitting Ctrl + F7 typically forces a sync; therefore, the person who wants to show their device will hit Ctrl + F7. Computers do vary, so it’s probably worth familiarizing yourself with your device—sometimes Fn + F3, F4, F5, F8, F9 or F10 are necessary. Worse case, you can unplug the HDMI or VGA cable for three seconds and re-plug it in or control the TL-6X1-HDV manually.
What happens if I am showing my content on the display and unplug my device?
The TL-6X1-HDV will default to the another connected source device. Priority will be given to the lowest numbered input (the six inputs are numbered from 1 – 6).
What is the de-embedded audio output for? I thought an HDMI output would send video and audio to my display?
The HDMI output on the TL-6X1-HDV does send both audio and video to whatever display or device is connected. This works great if your display is a flat panel with built-in speakers; however, in some systems the display might be a projector or monitor without audio capabilities. In this case, the de-embedded audio output comes in extremely handy…digital audio is essentially decoded from the HDMI stream and output on three different outputs simultaneously: a 3.5mm analog output, a phoenix analog audio output, and a TOSLink digital audio output. A standard audio cable can then connect the TL-6X1-HDV to an audio receiver, amplifier, or powered speaker.
What if my system requires multichannel audio?
That’s fine. The TL-6X1-HDV supports 5.1 surround sound audio output on both the HDMI output channel and TOSLink de-embedded audio output.
Do you manufacture audio systems like this?
Funny you should ask! We do, and we offer several different systems. Check out Products > Audio in our menu above.
Where do I put the switcher in my room?
The TL-6X1-HDV is pretty versatile, which is great because each room and system is different. Typically, we see the TL-6X1-HDV mounted under the conference room table, and we include a mounting kit for under table use. Alternatively, it can also be placed on the table top, secured in a remote rack or credenza, or even mounted behind your display (the included mounting kit works great for this also). Just make sure your cable runs are under 50 feet or you are using an active extender set.
-
TechLogix SKU# 1003-0202